These stretches are designed to loosen the muscles inside and around the pelvis.
Take the movements to a point of increased tension but never pain.
The exercises will help most when done every day.
Child's Pose: Step-by-Step Instructions
Step 1
Kneel on the floor. Touch your big toes together and sit on your heels, then separate your knees about as wide as your hips.
Step 2
Exhale and lay your torso down between your thighs. Broaden your sacrum across the back of your pelvis and narrow your hip points toward the navel, so that they nestle down onto the inner thighs. Lengthen your tailbone away from the back of the pelvis while you lift the base of your skull away from the back of your neck.
Step 3
Lay your hands on the floor alongside your torso, palms up, and release the fronts of your shoulders toward the floor. Feel how the weight of the front shoulders pulls the shoulder blades wide across your back.
Step 4
Balasana is a resting pose. Stay anywhere from 30 seconds to a few minutes. Beginners can also use Balasana to get a taste of a deep forward bend, where the torso rests on the thighs. Stay in the pose from 1 to 3 minutes. To come up, first lengthen the front torso, and then with an inhalation lift from the tailbone as it presses down and into the pelvis.
Cobra Pose: Step-by-Step Instructions
Step 1
Lie prone on the floor. Stretch your legs back, tops of the feet on the floor. Spread your hands on the floor under your shoulders. Hug the elbows back into your body.
Step 2
Press the tops of the feet and thighs and the pubis firmly into the floor.
Step 3
On an inhalation, begin to straighten the arms to lift the chest off the floor, going only to the height at which you can maintain a connection through your pubis to your legs. Press the tailbone toward the pubis and lift the pubis toward the navel. Narrow the hip points. Firm but don't harden the buttocks.
Step 4
Firm the shoulder blades against the back, puffing the side ribs forward. Lift through the top of the sternum but avoid pushing the front ribs forward, which only hardens the lower back. Distribute the back bend evenly throughout the entire spine.
Step 5
Hold the pose anywhere from 15 to 30 seconds, breathing easily. Release back to the floor with an exhalation.
Garland Pose: Step-by-Step Instructions
Step 1
Squat with your feet as close together as possible. (Keep your heels on the floor if you can; otherwise, support them on a folded mat.)
Step 2
Separate your thighs slightly wider than your torso. Exhaling, lean your torso forward and fit it snugly between your thighs.
Step 3
Press your elbows against your inner knees, bringing your palms to together in Anjali Mudra (Salutation Seal), and resist the knees into the elbows. This will help lengthen your front torso.
Step 4
To go further, press your inner thighs against the sides of your torso. Reach your arms forward, then swing them out to the sides and notch your shins into your armpits. Press your finger tips to the floor, or reach around the outside of your ankles and clasp your back heels.
Step 5
Hold the position for 30 seconds to 1 minute, then inhale, straighten the knees, and stand into Uttanasana.
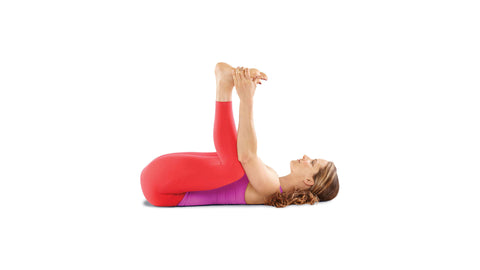
Happy Baby Pose: Step-by-Step Instructions
Step 1
Lie on your back. With an exhale, bend your knees into your belly.
Step 2
Inhale, grip the outsides of your feet with your hands (if you have difficulty holding the feet directly with your hands, hold onto a belt looped over each sole.) Open your knees slightly wider than your torso, then bring them up toward your armpits.
Step 3
Position each ankle directly over the knee, so your shins are perpendicular to the floor. Flex through the heels. Gently push your feet up into your hands (or the belts) as you pull your hands down to create a resistance.
Bound Angle Pose: Step-by-Step Instructions
Step 1
Sit with your legs straight out in front of you, raising your pelvis on a blanket if your hips or groins are tight. Exhale, bend your knees, pull your heels toward your pelvis, then drop your knees out to the sides and press the soles of your feet together.
Step 2
Bring your heels as close to your pelvis as you comfortably can. With the first and second finger and thumb, grasp the big toe of each foot. Always keep the outer edges of the feet firmly on the floor. If it isn't possible to hold the toes, clasp each hand around the same-side ankle or shin.
Step 3
Sit so that the pubis in front and the tailbone in back are equidistant from the floor. The perineum then will be approximately parallel to the floor and the pelvis in a neutral position. Firm the sacrum and shoulder blades against the back and lengthen the front torso through the top of the sternum.
Step 4
Never force your knees down. Instead release the heads of the thigh bones toward the floor. When this action leads, the knees follow.
Step 5
Stay in this pose anywhere from 1 to 5 minutes. Then inhale, lift your knees away from the floor, and extend the legs back to their original position.
Half Lord of the Fishes Pose: Step-by-Step Instructions
Step 1
Sit on the floor with your legs straight out in front of you, buttocks supported on a folded blanket. Bend your knees, put your feet on the floor, then slide your left foot under your right leg to the outside of your right hip. Lay the outside of the left leg on the floor. Step the right foot over the left leg and stand it on the floor outside your left hip. The right knee will point directly up at the ceiling.
Step 2
Exhale and twist toward the inside of the right thigh. Press the right hand against the floor just behind your right buttock, and set your left upper arm on the outside of your right thigh near the knee. Pull your front torso and inner right thigh snugly together.
Step 3
Press the inner right foot very actively into the floor, release the right groin, and lengthen the front torso. Lean the upper torso back slightly, against the shoulder blades, and continue to lengthen the tailbone into the floor.
Step 4
You can turn your head in one of two directions: Continue the twist of the torso by turning it to the right; or counter the twist of the torso by turning it left and looking over the left shoulder at the right foot.
With every inhalation lift a little more through the sternum, pushing the fingers against the floor to help. Twist a little more with every exhalation. Be sure to distribute the twist evenly throughout the entire length of the spine; don't concentrate it in the lower back. Stay for 30 seconds to 1 minute, then release with an exhalation, return to the starting position, and repeat to the left for the same length of time. Watch a video demonstration of this pose.
_______________________